Mountain bikes are a massive amount of fun. Ripping down trails and enjoying the great outdoors is just what it is all about. A pleasant mountain bike ride can be turned pretty awful if your mountain bike doesn’t fit right. A bike should fit comfortably, and you should not get any unpleasant feelings from riding your bike.
Mountain bikes need to fit correctly, or you are entirely taking yourself away from a great experience. When we ask how a mountain bike should fit, what are we talking about? It’s about making the mountain bike comfortable for you, and here’s what we think is vital.
- Bike Type
- Geometry
- Frame Size
- Adjusting your fit
In this article, we’re going to speak about getting you the right bike and giving yourself a mini bike fit ready to get you out riding comfortably.
Bike Type

When you first start looking at bikes, it’s essential to ensure that you will get the right bike for your riding. The riding style is significant, and you need to make sure you have the right bike for the job.
Men’s or women’s
The first thing you will want to think about is who the bike is designed for. I have often seen many men on women’s bikes and women on men’s bikes.
Yes, I appreciate that this sounds crazy, but it can be an easy mistake, especially when buying a second-hand bike. They are women’s bikes for a reason and men’s bikes for a reason.
Picking the wrong sex bike, you will struggle to get comfortable. You will find most are unisex, so more than likely, you will be ok.
The bike for your riding style
There are many different mountain bikes on the market, and getting the right one for your style of riding is so important. Riding a cross-country bike on a downhill course is possible, but it isn’t going to be comfortable. You have four different main mountain bike styles;
- Cross Country
- All Mountain
- Enduro
- Downhill
I would highly advise getting a bike design for the riding you are doing as it will make the experience better for you from a comfort point of view, but also, you’re going to perform much better too.
Mountain Bike Geometry

Geometry is the design of the bike and the impact it will have on the user. For example, downhill bikes are made to be very aggressive so that you can be as quick as possible on a course. With courses only lasting for typically 2-5 minutes, you won’t feel too uncomfortable as the time period is so short.
Cross Country bikes are made for long-distance riding, so they have a very comfortable geometry for those long days out and put you in a more upright position which is much easier to ride in.
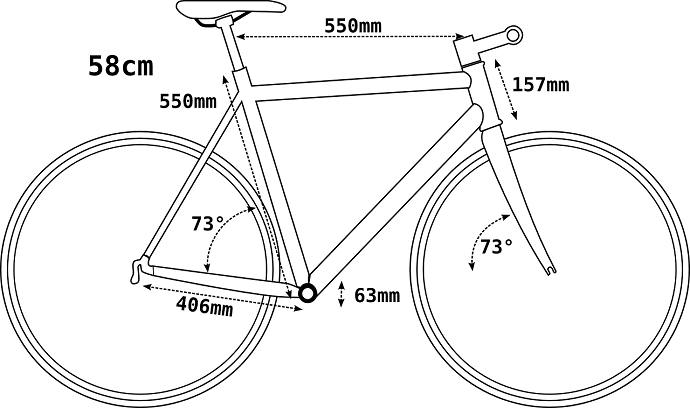
Geometry is very complex, but a great rule of basic understanding is looking at your seat height next to your handlebar height. If your seat is higher than your handlebars, it won’t be as comfortable as if your handlebars were more elevated than your seat. Whenever you’re looking at buying a bike from your local bike shop, ask about the geometry.
Frame size
When you start looking at bikes in your local shop or searching through eBay, it’s vital that if you want a comfortable bike, focus on the frame size first. The mountain bike frame size has to be correct. Many riders don’t and end up having a reasonably uncomfortable time when they start using their purchased bike.
Bike manufacturers tend not to make too many different sizes and they will keep their mountain bike sizing as basic as they can. Frame sizes come in typically
- XS (Extra Small)
- S (Small)
- M (Medium)
- L (Large)
- XL (Extra Large)
Sizing up and down
Sometimes we fall between the cracks of, say, medium and large, and this is an issue I have personally found bikes for myself. Depending on the bike they might not have the right size mountain bike for you. Commonly, you can fall between two sizes, and then you need to choose to either size up or size down. How do we size up and down?
- Adjust the Stem length
- Change the Seat post on some bikes
- Change the Handlebars
Personally, I have found that if you went with the medium and sized up, you will get a more aggressive position than if you went with the large and sized down. I would recommend asking a bike fitter or contacting a bike shop and asking their advice, as every case is different.
You will also not want to size up by more than one size, for example fitting a large bike to a person needing a small, as it just doesn’t work successfully.
From my personal experience riding long distances, having the wrong frame size mountain bike isn’t going to do you any favors, and sizing up or down too much will completely change the way a bike rides.
We Think You’ll Like:
How to Tighten Mountain Bike Chain
How Much Weight Can a Mountain Bike Hold?
Bike Fit

As a bike fitter myself, I highly recommend getting a bike fit. This is where a professional will make all the adjustments to your bike so you can ride it comfortably. They can cost anywhere from $60 to $500, depending on the level of fit that you want.
A cheaper alternative is to fit yourself via an application or Youtube videos, and although complex can be an excellent way to achieve a bike fit. I have found that people doing their own bike fit usually are only about 85% right, but that’s much better than no fit at all.
Although there are many aspects to a bike fit, getting the fundamentals right will go a long way, then the rest can be finely tuned. For basic riders just looking to get comfortable, the three dynamics I would look at are;
- Set saddle height
- Set saddle layback
- Set handlebar reach
Once these are correct, it will feel much more comfortable, and then you will roughly be in the right place, which is a great start. You will need a book, a tape measure, a level, a plumb line, and a set of Allen keys for this mini fit.
Setting saddle height

Getting the saddle height right is relatively straight forward and what we are trying to achieve is a 10 to 15-degree angle at the bottom of your pedal stroke.
Step one: Level your saddle
That simple, get a level and put it on your saddle so it is flat. If you don’t have a level, do it by eye.
Step two: Adjust the saddle height
The first method is to jump on your bike. Try standing it up against a wall with you on it, or having it in a turbo trainer is much easier. Put the crank arm on your right at the lowest point of the pedal stroke and furthest away from you.
Then on that right-hand side, put your heel on the pedal, not the front of your foot but the back. Your leg should be straight here. If it’s not touching, adjust the saddle lower and try again. If there’s still a bend in the knee, go higher. Once you have that right, put your foot in the correct position, and you should have that 10 to 15-degree angle at the knee.
The second method is to measure your trouser inseam. We do this by standing against a wall and putting a book in between our legs as high as it will go comfortably. Hold the book on the wall, move away, then measure the floor to the high point the book touches.
Say this is 740mm, then we times this by 0.883. So that’s 740mm x 0.833 makes 653mm. This will be the measurement you will need from the center of the crank where the bottom bracket is to the middle of the saddle running up the Seatpost. Now you just need to loosen the bolt on your seat tube and adjust as necessary.
Set saddle layback

Setting the saddle layback. Is pretty easy to sit on the bike, preferably in a turbo trainer. Imagine your crank as a clock. Put the right-hand side forward to 3 o clock. Now you need the ball of your foot to be vertical with the point just under your knee cap.
Get it roughly where you think it is correct, then test it with a plumb line. You can make a homemade plumb line by putting a small weight or tool on the end of a piece of string and hanging it below your kneecap, and it should go straight down to the ball of your foot if it doesn’t adjust your saddle back and forth until it is correct.
We Think You’ll Like It:
Why Are Mountain Bikes So Expensive?
What Are the Best Mountain Bike Brands?
Set handlebar reach
When we need to get out the handlebar to reach correct, the easiest way is to imagine that you are trying to make a right angle from your hip bone to your shoulders and your shoulders to your handlebars, as pictured below.
You want to feel that you’re not reaching too far forward, and you also don’t want to feel scrunched up. To adjust the handlebars back and forward, you can tilt your handlebars for minimal adjustments, and this will change the height too.
If you go down this route the brake levers and gear levers will need adjusting too. The ideal is to change the stem out for a shorter or longer one.
Once your setup
This guide to a mini fitment is a good starting point for a basic bike setup. We highly recommend seeing a fitter as there’s much more to bike fits than this, such as set up riding shoes, optimal riding position, bar height, bar width and much more.
Conclusion
Mountain bikes should feel comfortable. If you are out riding, having discomfort is not what the mountain biking experience is about. You should feel at one with the bike, and it should feel like a pleasure to ride it. The fundamentals are having the right size frame, the right style of bike for your riding, and then making minor adjustments to get your fit right. If you are still having issues after this, we recommend seeing a professional fitter.


